Tuesday 23 October 2012

Simon Says Stamp and Show, so I have.

Well, I really can't believe how long it is since I last wrote anything on here...................
.............July!, crikey! where have the weeks gone?

I haven't been doing nothing, I just haven't been telling you about it, but it's about time I got serious about having fun, so I'm seriously going to try to blog more often (I know, you've heard it said before)

Having spent some quality crafting time with a lovely lady who has fast become a firm friend, I have been nudged into thinking it's time for some Christmas makes.
Debbie (the name of the afore mentioned lovely lady) brought a Chritmas tree to my house which she had made from a folded paperback book. She was looking for inspiration on how to decorate it. I fell in love with it immediately and had to have a go.
I looked out a long forgotten book, which I didn't think twice about re-cycling and got to work.


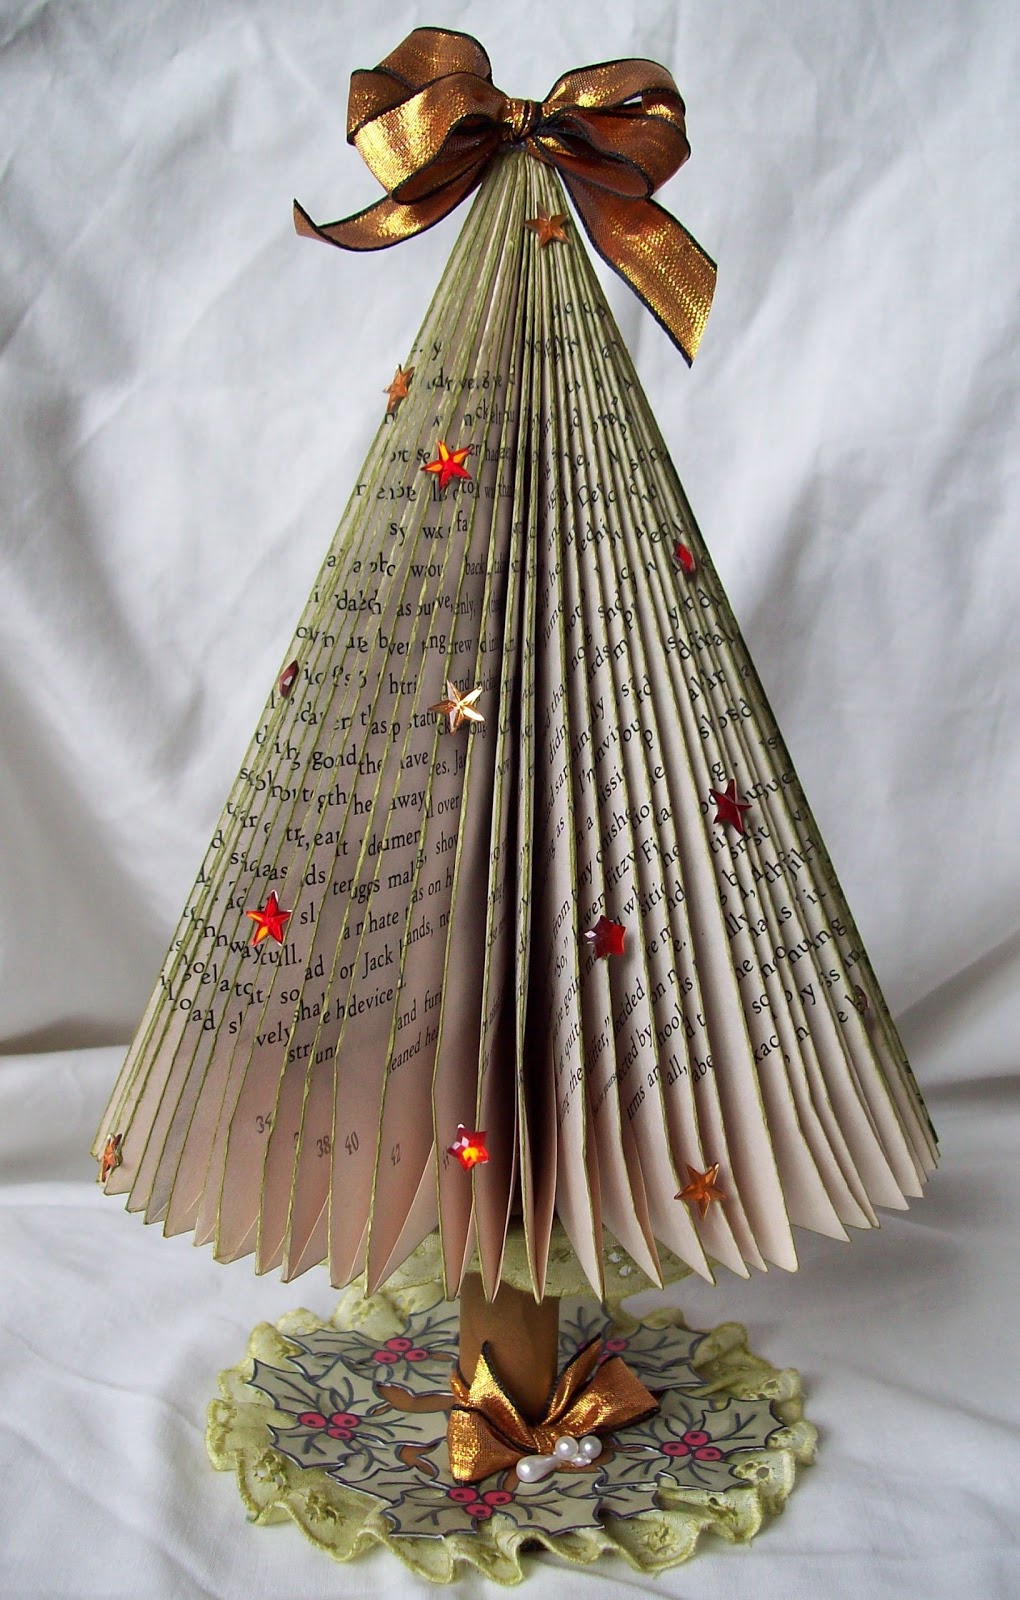
I made a stand for the tree out of an old ribbon spool, which I decorated with some broderie anglaise lace coloured with "peeled paint" distress ink, some stamped and coloured holly leaves from the new stamps by Jo Channon and Maria Maidment for Let's Create, and some ribbon and pearls.


I added colour to the tree with more peeled paint, and stuck on some stars and a bow.


 Having made  this, and being thoroughly pleased with it, I decided to have another go, this time with only half a page (to make a tiny tree only 3.5" tall)

I had spent a fun filled day at Let's Create in Coningsby where Hels Sheridan was demo-ing the fabby Studio 490 Art Parts etc by Wendy Vecchi, and thought that this little frame would be perfect for the job.
So, I printed out the words for "Oh Christmas Tree", stuck it to the back piece and distressed it with peeled paint. For the frame, I used some hot-of-the-press paper which I sanded and stained (again with peeled paint).
The little shelf is a small piece of scalloped Art Parts with pre-made holes. I threaded some fine chain through the holes and added beads buttons and pearls for interest. 

The tree, once again is coloured with peeled paint, and decorated with some little hand made bows with flat backed pearls.
This will be one of my entries into the Simon Says Stamp and Show challenge this week.

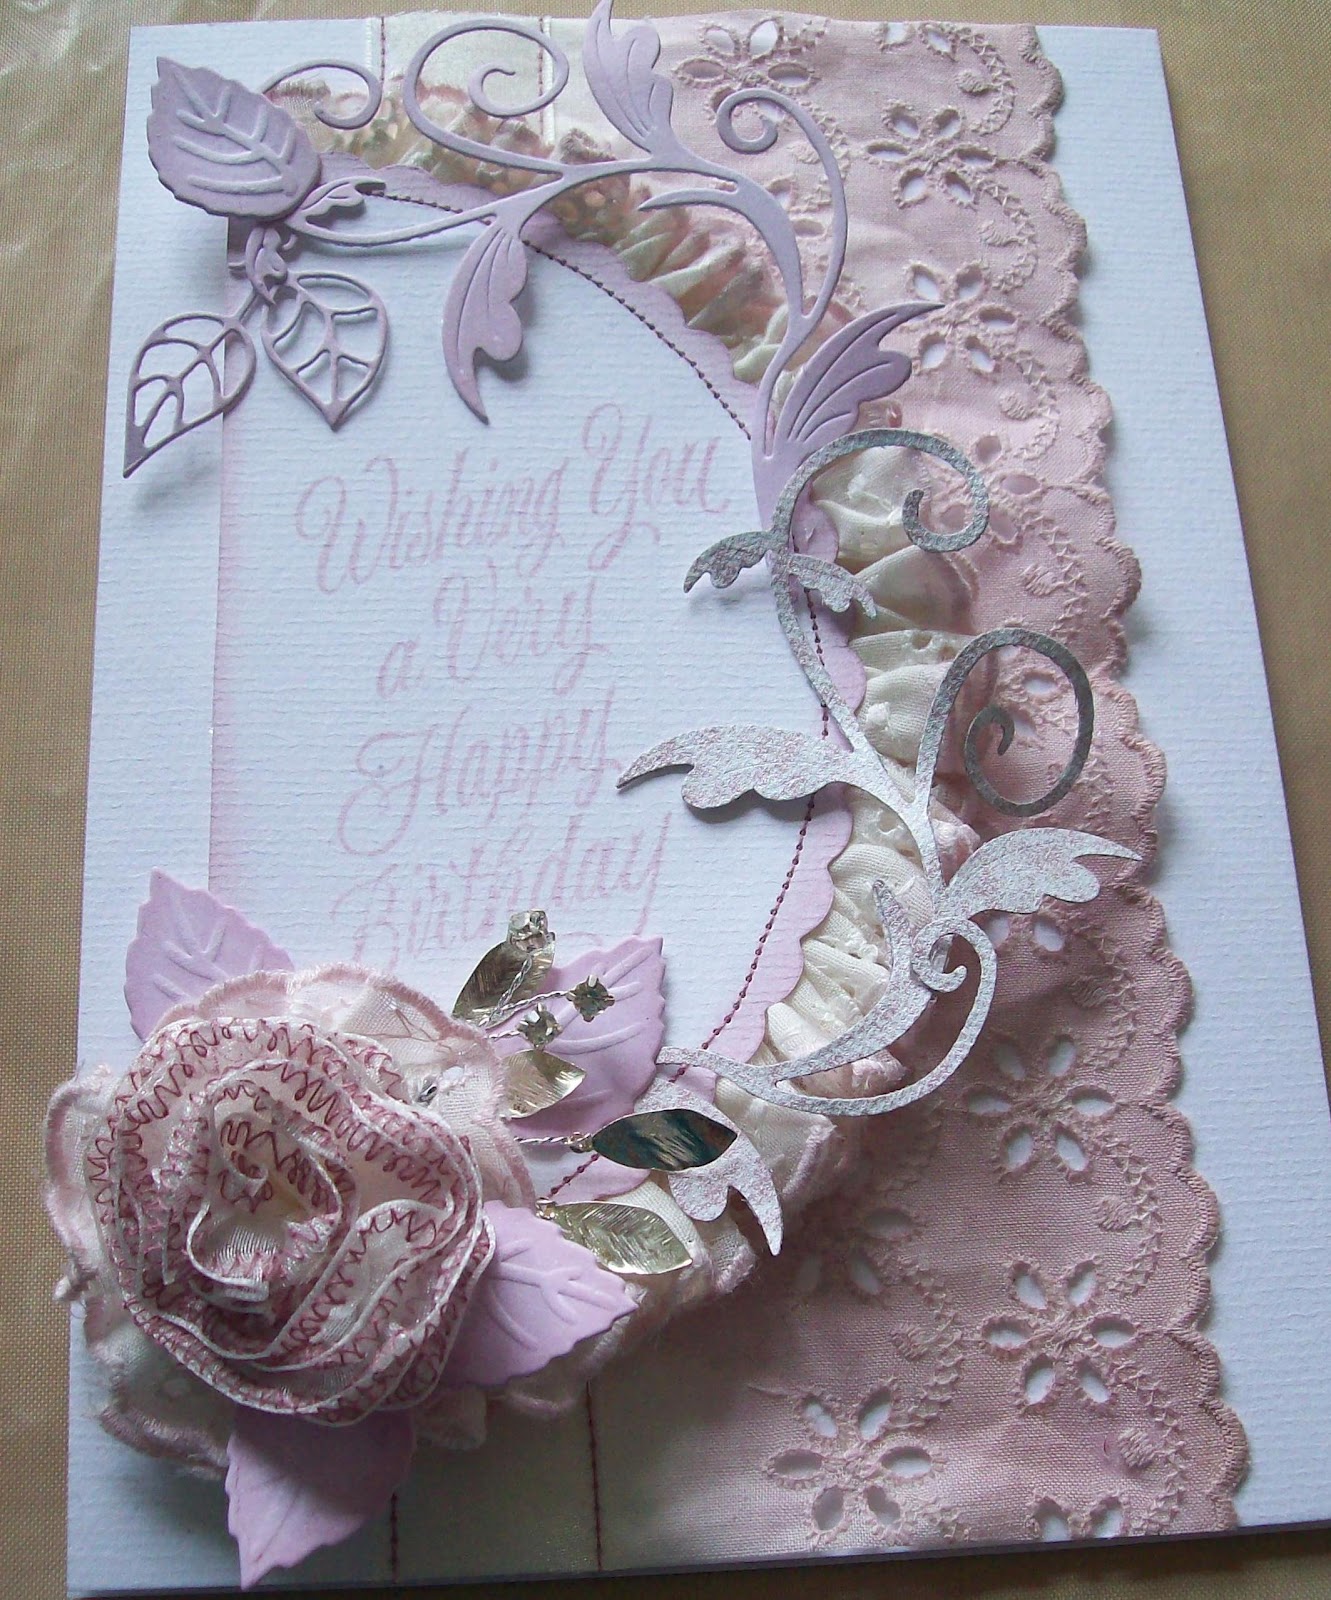
Another of my makes this week is this Art Parts frame.
I used milled lavender and dusty concord to add clour to the blue paper, stamping the swirly design from Wendy Vecchi's Botanical Art stamp set in dusty concord.


The wording is an Irish blessing from the Creative Expressions stamp set "Garden Sayings", and the butterflies are from Maya Road, coloured with dusty concord distressing ink and covered in stickles glitter. A few flat back pearls finish the job.

This will be my second offering at Simon Says Stamp and Show.

Well, that's enough waffle from me for now, but I will be back very soon - I promise xxx

Shelliex


Wednesday 25 July 2012

Hats off to grunge paper!

My lovely hubby bought me the latest copy of Craft Stamper mag last week, and in it was a fantastic top hat designed by Kim Costello.
I had to have a go at making it, so I downloaded the pattern from the website and got to playing.
Many hours of hat, flower and stand making later, this is the finished article................


I used:
Hat pattern by Kim Costello.
Studio 490 - Accents for Art stamp.
Creative Expressions - swirl stamp.
2x sheets grunge paper.
Distress inks: sage green, pine needles, rusty hinge, spiced marmalade.
"Twiddleybitz" leaves
velvet ribbon and string coloured with DI's
Round "art parts" for base, rolled up textured card for stand.

The hat is 3.5" tall and the whole thing stands 8" tall. It was great fun to make, and now I think I have to go and make a purple one..................................


Until next time, take care and happy crafting.

Shellie

Monday 2 July 2012

posh frocks...........

I've been quite busy of late, yes with some crafting, but also with some sewing.

Saturday 30th June saw the annual Green Tie Ball for Bayleigh's irish dancing school Inis Cara.

I had made a new dancing dress for her a while ago, but she is growing at such a rate of knots that I had to lengthen it before she had even worn it!
Here she is in all her finery.


I also made a ballgown for myself, being a strange shape does not allow for shop bought frocks, so it's a blessing to be able to sew!
As you well know by now, my favorite colour is purple, and black is always a good colour too. Here I am with my glass of green "fizz".


Lastly, here is a pic of Bayleigh and me. I have 4" heels on, and she is still almost as tall as me (at 10 years old)!


Well, I'm off now to make some more class costumes ready for the class feis next Sunday.
I'll hopefully find some time to do some crafting too.

Until next time, take care and happy crafting.


Shellie xx

Tuesday 5 June 2012

Fun, fun, fun

Another wonderful demo day at Let's Create in Coningsby.

Leonie Pujol came along to demo some fabby stuff, the most impressive of which was "Hearty" clay - a mega lightweigh paper clay.

Bayleigh came with me, she had fantastic day, and completely fell in love with Leonie. I think "idolises" may be a better word.

Needless to say we bought some goodies, and HAD to play when we got home!

Bayleigh spent lots of time playing with the clay and moulds, I'll post some photo's when she has finished them off, but she also made this lovely tag:


I made this topper:


I also made this decorated disc from my "Art Parts" stash - as I said - I am so in love with this medium!


OK, so, what to do today?
Ah, it's still bank holiday, so I think I might spoil myself and craft some more.


Whatever you are doing, have fun, take care, and happy crafting

Shellie

Tuesday 1 May 2012

Fun with Art Parts

Well, what can I say?

I'm in love again!

I went to my lovely local craft shop - Let's Create- in Coningsby on Saturday. Jo had arranged for Hels Sheridan to come along and demonstrate her wonderful work with Wendy Vecchi's "Art Parts" and Tim Holzt's Distress Ink/Stain etc.

I was hooked from the word go, so I used up all of my limited funds to buy some "essentials". The stamp set I really wanted had sold out, but Hels kindly gave me some of her pre-stamped flowers so that I could at least have a go.
I went home, made a quick bolognaise (thanks for the suggestion Maria), and started to play with my goodies.
Not having many of the nik-naks needed for this kind of craft, I had to improvise. My lovely hubby has a saying for this...............
"It's not bodging, it's utilising all available resources"
............needless to say I had LOTS of fun, and yes I am in love ALL OVER AGAIN :o)

This little table - my very first make- stands 7" tall to the top of the butterfly wing.


I then made this lttle frame. it is a mere 4" high.


Those roses are such fun to make, and rest asured, as soon as Jo has them back in stock, I WILL be buying the stamp.


Shellie.

Thursday 19 April 2012

A 90th Birthday card, and a tutorial.


Firstly, an apology.
I'm so sorry that I haven't been around for a while, life just got in the way a bit.

Now for the latest make...............
This is the card I made for my Nanna's 90th birthday. It is A4 size, so it took quite a bit of making!


I showed it to some lovely friends of mine who suggested I do a tutorial for the basket ( I hand drew and coloured it), so here goes.............


1). Using pearlised cardstock, take an A5 piece and mark a 1cm grid lightly in pencil.
      On every other square draw semicircles top and bottom of the square.


2). In the squares between, do the same again.


3). Now add the vertical semicircles.


4). Add circles to the bottom to finish the weave.


5).  Finish the top of the basket with more circles and a fancy edge.


6). Now ink the basket in using micron 04 pen or similar. (it must be a pen which is compatible with your choice of blending pen). Erase the pencil lines.


7). Colour the areas between the weave to add depth.


8). Add shading and crease lines for definition.


9). Colour with your choice of blending pen. I used Promarkers.
      Add a little extra shading for depth.


10). Cut and fold the basket, adding contrasting ribbon and a bow.


11). Attach to your card front and fill with flowers, leaves and swirls. I used Little Claires "flowerhead" stamp and some hand-drawn leaves.


12). The last step is to protect your basket with a sheet of Acetate, and embellish with more ribbon.


I hope you found this tutorial interesting and informative. The technique can be used for many different shapes and sizes of basket.

Until next time, take care and happy crafting.

Shellie xx


Tuesday 28 February 2012

my two passions

I have been trying out a new technique. I love to make cards AND I love to sew, so I thought I'd try mixing the two. Here are the results. I thoroughly enjoyed making them, and I will definately carry on in the vein for a good while longer yet!
I have so many ideas in my head, and not enough hours to craft.


 I started by colouring the broderie anglaise lace with milled lavender distress ink and machine stitched it to the plain cream cardstock along with some 1" organza ribbon. Then I gathered the narrow lace and  machine stiched it onto a simi-circle of stamped and distressed cream card.
I made a ribbon rose by zigzag machine stitching some 1" organza ribbon in a contasting colour thread, gathering and rolling it.
A few die-cut and coloured leaves and flourishes add the finishing touches.


For this next one, I used pumice stone distress ink.

 I started by machine stiching some small white stars onto a die-cut piece of miriboard.
then I stamped, cut and distressed a circle of pearlescent cardstock and edged it with some pearl beads on a string.
 I machine stitched some olive coloured ribbon onto a die-cut and distressed piece of  pearlescent cardstock, and then layered up using the topper, some die-cut leaves and swirls, and a paper flower.

If I can work out how, I will be entering the first card in the Allsorts challenge this week - there's a first time for everything!

Bye for now,
take care and happy crafting,

Shellie xx