Vandaag is Shellie onze guest designer.
Zij maakte deze schattig kerstdoosjes.
Today we have Shellie as guest designer.
Look what a beautiful Christmas Treat Cartons she made.


Well, it isn’t long now until the big day. Whether you like sweet or savoury treats,
these little boxes are perfect for a fun sized surprise.
Start with the display board. This can be drying while you work on the boxes.
Using the Crealies 20cm MDF circle, arrange five 5cm x 5cm card squares.
A small piece of double sided tape will help keep them temporarily in place.

Create a layer of snow with white gesso paste. Do not cover the card squares.

While the paste is still not quite set, carefully remove the card squares
and allow the paste to fully set. Overnight would be great.

Once dry, paint it white and stipple with silver glitter paste.

Now for the cartons. Here are the pieces I used for each one.

Red carton:
Brush a silver pigmentzz wash over some plain white card.
Cut the backing panels for the silver snowflake negatives from this.
To create the snowflake negative strip, stick the five dies together in a random pattern.
This will help to prevent the dies moving, and make it easier to place them on the card.


Stick the box pieces together, add the snowflake panels on the front and back,
and some snowflakes on the sides.

Fold in and glue the base.
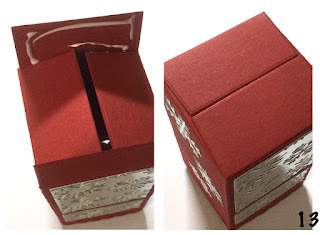
Fill with a treat, glue the top, and finish with the tag and some ribbon.

Green snowman carton:
Cut two side panels from plain white card.
Stamp and clear emboss the snowman onto both of these, along with 4 extras.

Using pigmentzz, paint the snowman and cut the extras as shown. Decoupage the snowmen.

Glue the carton pieces together, stick the snowman panels to blue metallic card backing,
and attach these to the carton front and back. Place a tasty treat inside
and glue the top. Finish with the label and some ribbon.

Silver lantern carton:

This one is lightly different. Cut a lantern aperture into the carton pieces,
and back these with yellow.

Take 2 of the fancy lantern pieces and cut a candle from each one.

Stick the candle inside this opening, and cover with a ‘complete’ fancy lantern.
Glue the carton pieces together, place something yummy inside the carton,
seal the top, and finish with the tag and ribbon.

Gold candlesticks carton:


This is a simple cut and stick project. Tiny pieces of candle and flame are mixed and matched.
Blue stars carton:

Taking the stars, arrange them however you like the look of them, and glue firmly into place.

Once dry, carefully fold along score lines and glue carton together. Drop in something delicious, and stick the top. Finish with the tag and some ribbon.

Trim the edge of the display board with some sparkly ribbon, and place the cartons on their squares. This makes a lovely centrepiece on a buffet table, a welcome plate in a hallway, or just as a festive feature anywhere.
I hope you’ve enjoyed my post, and hope to see you again soon.
Shellie.
Crealies Dies / Stansen:
Crealies Stamps / Stempels:
Mixed Media:


